So I recently joined a photography group called Rebel Rousers. I am very excited about the group and even more excited to learn more about photography. I just start shooting in manual mode so I have so much to learn! Actually I have so much to learn that I simply feel overwhelmed by everything I don't know.
I got to pick a topic to present on for October's meeting and I decided to choose something that I didn't understand - white balance. I found it very helpful to concentrate on a single topic. I check out several websites and this is what I presented to the Rebel Rousers group.
Why I choose white balance? Since our days are getting shorter and colder we will be doing a lot of indoor shooting over the next couple of months – I want to take better indoor pictures in all kinds of light. I wanted to learn how to adjust my white balance so I can capture the colors in my pictures as accurately as possible.
What is white balance? Ever notice when you take your pictures that they have a funny color to them like orange, blue, or yellow? Here are some from my collection:
Here is picture of Anna in her bed room. Normally I let in all the natural light that I can before I take a picture but I wanted to capture her first morning waking up with a bad hairdo. Since it was nice and early in the morning – there was no natural light to be let in. Notice how this picture has a funny tint to it.
Here is also one from my nephew’s birthday party – notice how everything seems to be orange. His birthday party theme was orange but I wasn’t thrilled when this picture turned out orange.
You can fix these “tints” or “casts” in an editing program if you shoot in raw format but you can take some steps while taking your pictures so you will have one less thing to edit. But before I get to that – I am going to try and explain why pictures look like this.
In a nutshell – different sources of light have different “color” or temperature to them and our cameras cannot always determine what type of light temperature we are shooting in. For example fluorescent lighting adds a bluish cast to your pictures where as tungsten lightening (regular light bulbs) adds a yellowish color to your pictures. Each type of light gives off a different temperature thus the different color of tints.
The lower the Kelvin temperature the warmer the light.
The higher the Kelvin temperature the cooler the light
When shooting in a cool light (bluish) you need to tell the camera to warm things up
When shooting in a warm light (yellowish) need to tell the camera to cool things down
What "color" or temperatures are different light sources?
Light Source Avg. Temp (in Kelvin)
Noon Daylight 5000K
Cloudy 6000K
Shade 7000K
Tungsten Lighting 2700K-33000
Fluorescent 4000K
How to adjust white balance? From what I have found there are two ways to adjust your white balance, use the preset white balance setting on your camera OR do a manual white balance adjustment
Preset White Balance Settings
Auto – 90% camera will get the correct white balance on this setting
Tungsten - is for shooting indoors, especially under warmer (yellowish) tungsten lighting (such as bulb lighting). It generally cools down the colors in photos.
Fluorescent – this compensates for the ‘cool’ or bluish light of fluorescent light and will warm up your shots.
Cloudy – this setting generally warms things up a touch
Shade – the light in shade is generally cooler (bluer) than shooting in direct sunlight so this mode will warm things up a little
Manual White Balance Adjustment
Press WB button on back of camera and select Custom White Balance
Take a white sheet of paper in the lighting that you will be shooting in, fill the frame of your camera with the paper and take a picture. HINT: Hold the paper angled so that it is reflecting the light you are shooting in.
Press your Menu button, go to the shooting page second menu and select Custom White Balance, the picture you just took should appear. Select Set, then OK, and Select one last time.
Here are my examples of my adventures in white balance:
Incandescent Lighting
Here is what my custom white balance shot looked like for my Tide picture.
I am really impressed with the final result using the custom white balance setting.
Fluorescent Lighting
Here is what my custom white balance shot looked like for my work picture.
At first when I tried doing this white balance shoot my customer picture was turning out green. I think it was because I had laid my paper against my pen holder and took the shot. So I then took the white balance shot again holding the paper and then it worked out great.
Overcast Day
Here is what my custom white balance shot looked like for my cloudy picture.
It was really windy when I took the picture and that is why I don’t think my custom shot was reading correctly. So with the inability to hold my white sheet of paper with both hand and still take a picture, I just gave up.
Cloudy / Sunny Day PM
I think I prefer how the cloudy white balance setting - sun was constantly coming out and going behind the clouds this afternoon.
Sunny Day Early Afternoon
I think that any of these four setting for white balance give okay results for my "Chicago" picture. I do however find myself prefering the warmth that shows on the shade setting.
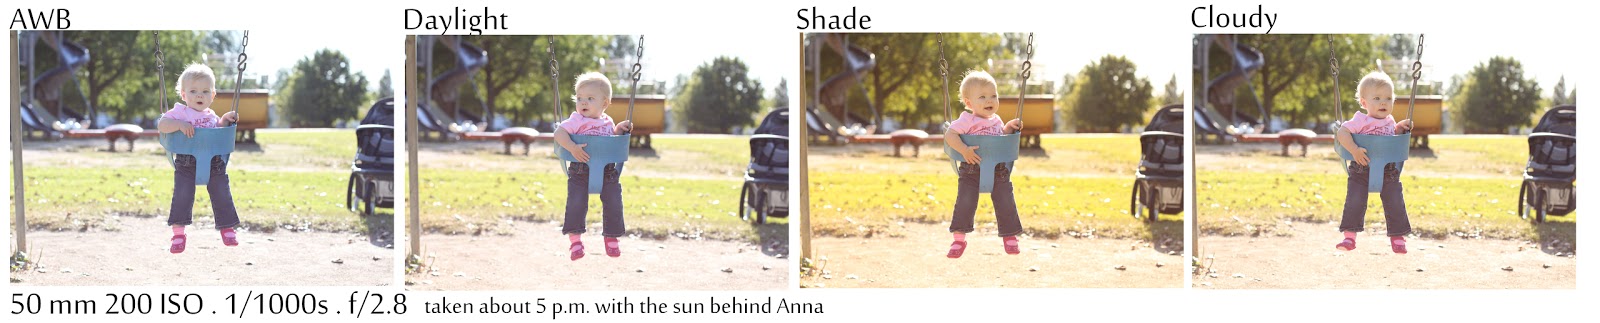
Sunny Day Late Afternoon
In this example I would have to say that the auto white balance would be the least favorite of the four shots. Daylight definately gives me the most true colors but again I love the warmth with the shade setting.
Shade Early Afternoon
Shade Late Afternoon
For both of my shade samples I am pretty happy with the auto white balance setting but I do feel like I get a better picture when the white balance is set to shade.
Challenge Time:
My challenge to you is to take the time to try multiple white balance settings in all the different types of light you take pictures in. Take the same picture multiple times with only changing your white balance setting and then compare them and then decide which setting your prefer for different light sources.